Key Takeaways
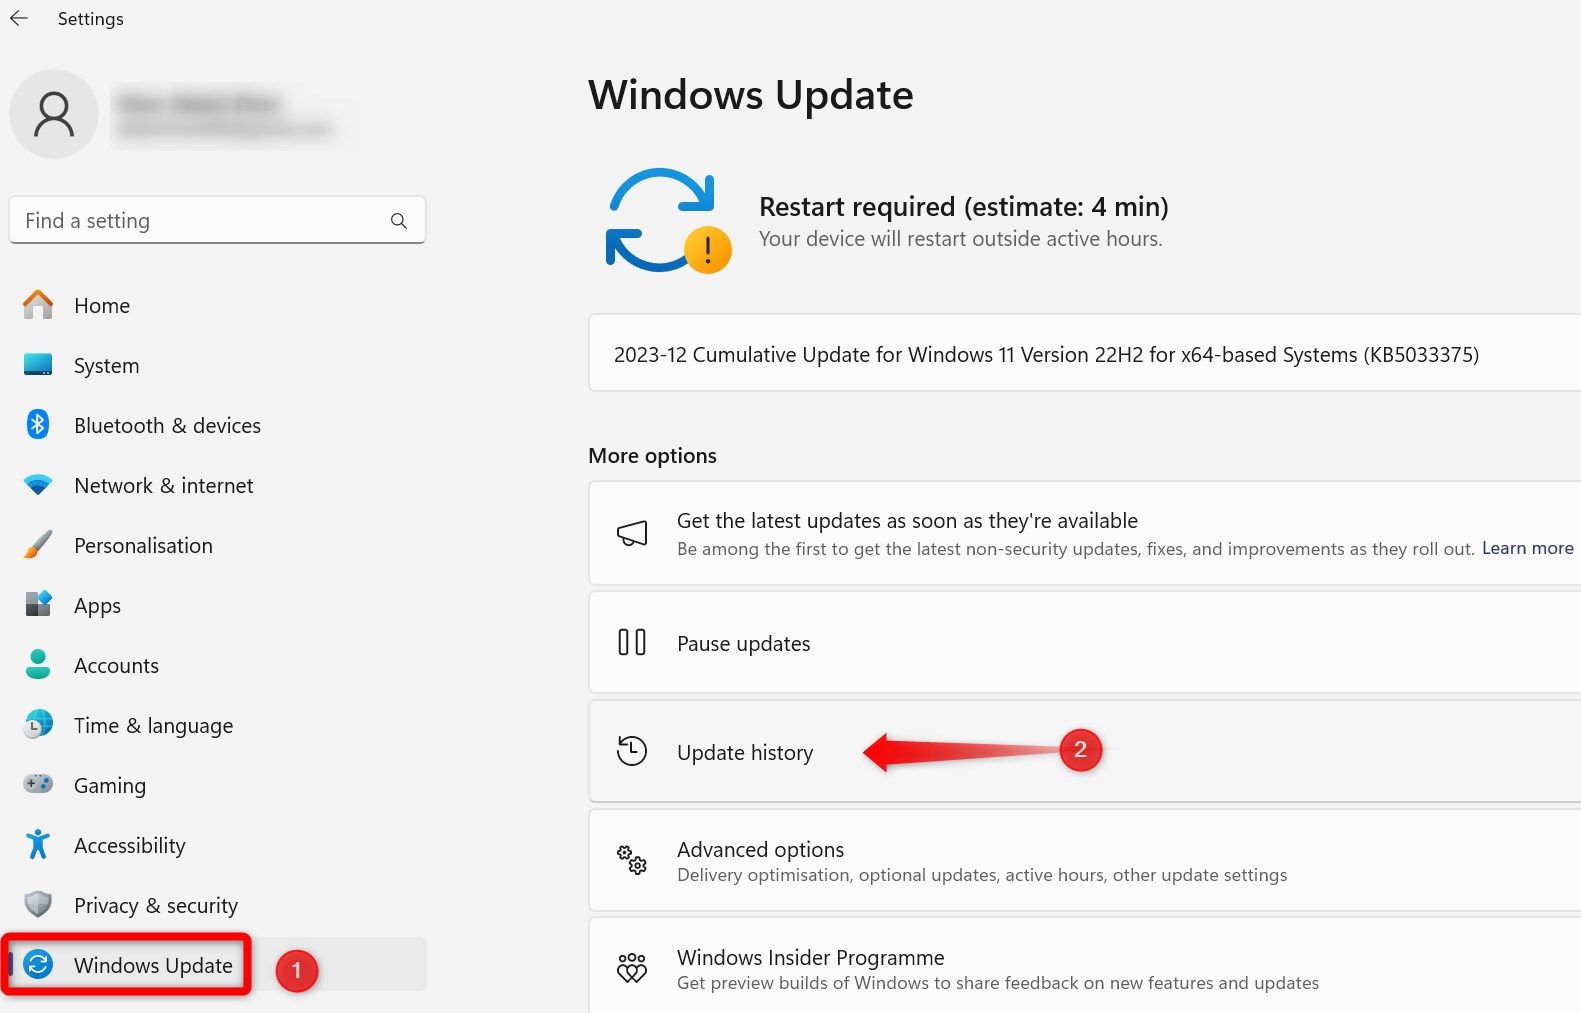
- Uninstall the latest Windows update by going to Settings > Windows Update > Update History > Uninstall Updates > Uninstall.
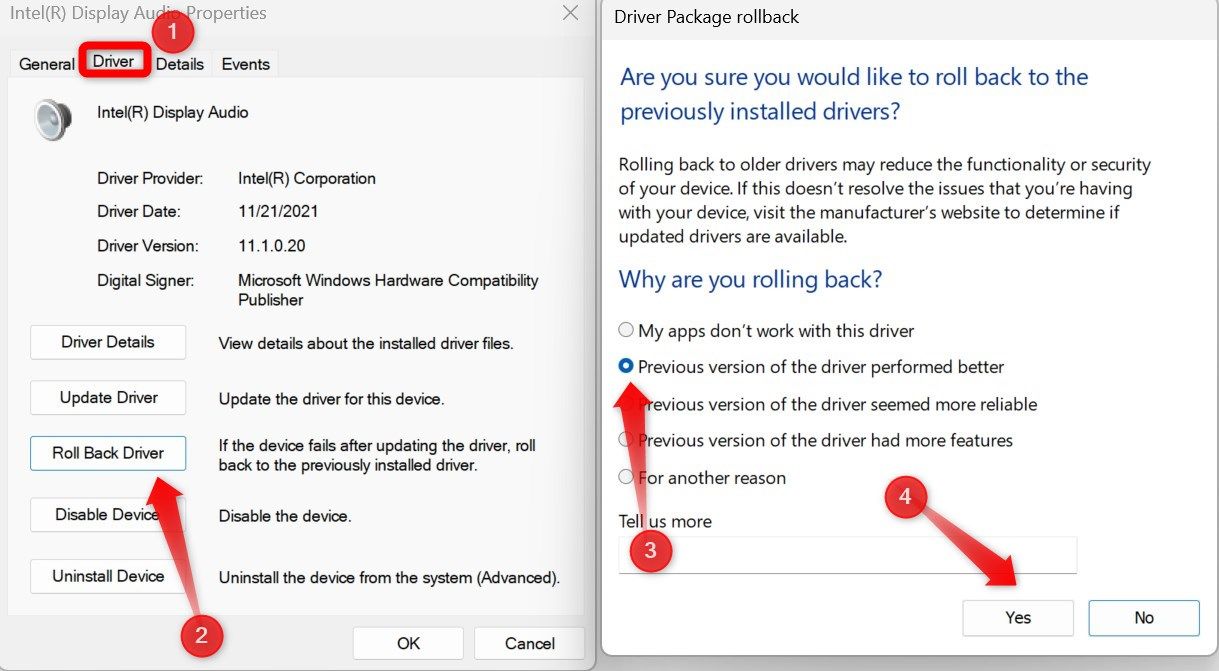
- Revert the recently updated driver. Go to Device Manager, right-click on the driver, and open “Properties.” Then, go to the “Driver” tab and click “Roll Back Driver.”
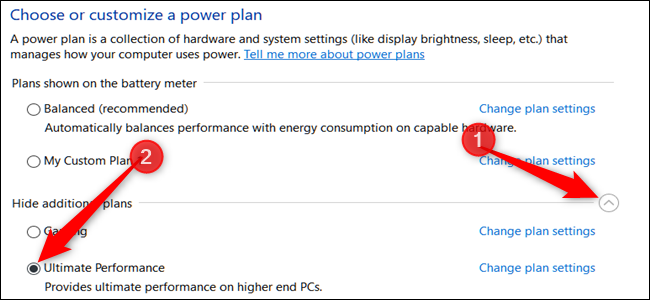
- Switch to the Ultimate Performance plan. Open the Control Panel, go to System and Security > Power Options, and select the “Ultimate Performance” plan here.
Has your Windows PC slowed down significantly after installing the latest Windows update? While a buggy update could be responsible for the slowdown, other factors could also be to blame. These solutions will help you identify the root cause and resolve the problem, making your device faster again.
Perform Some Preliminary Checks
Before delving into a detailed investigation, let’s perform some basic troubleshooting steps. First, restart your laptop or desktop PC. Windows often requires you to restart your device to complete the installation of updates. If you’ve recently downloaded and installed an update but haven’t restarted your computer, do so and see whether it resolves the problem.
If several applications are running simultaneously, consider closing some of them. Likewise, disconnect any external peripherals (wired or wireless) attached to your device, and unplug your phone if it’s tethered to your system. Excessive heat can also impact system performance, so if your laptop feels too hot, move it closer to a fan or an open space to cool it down.
If these initial steps don’t fix the issue, try the steps we outline below.
Uninstall the Latest Windows Update
If you suspect installing the recent Windows Update has caused your computer to slow down, it’s logical to investigate this possibility first. The easiest way to check is by uninstalling the recently installed Windows Update. Open Settings, navigate to the “Windows Update” tab on the left and click “Update History” in the right pane.
Here, open the recently installed updates, particularly the “Quality Updates” and “Driver Updates.” Take note of their version or any other relevant details.
Then, proceed to the “Windows Update” tab on the left and open “Update History” on the right. Scroll to the bottom of the page and click on “Uninstall Updates.”
Identify the recently installed updates and click “Uninstall” next to the relevant update. Then, follow the on-screen instructions to complete the uninstallation process.
If your PC’s performance improves after uninstalling a Windows Update, it strongly suggests that a problematic update was likely the cause. To further confirm, search online resources about the update, particularly on the Microsoft Community forum. If other users report experiencing similar issues it is almost certainly a problem with the update.
Keep track of the release of subsequent Windows Updates, where Microsoft may address and resolve the existing bugs that are causing the slowdown.
If uninstalling the update doesn’t improve your device’s performance, it indicates that the issue is not related to the update. So, try the remaining fixes.
Revert the Recently Updated Driver
If you have manually updated a driver for a specific hardware component after updating your operating system and then suddenly experienced a slowdown, a buggy driver could be responsible. To rule out a problem with new drivers, consider rolling back the driver update. To do that, right-click the Windows Start button and select “Device Manager.”
Next, expand the category of the driver you updated, right-click on the updated driver, and select “Properties.” Navigate to the “Driver” tab and click “Roll Back Driver.” Choose the reason for rolling back, and click “Yes.”
If rolling back the driver update resolves the issue, report the problem to the hardware manufacturer and await the release of a new driver.
Ensure the Drive Containing the OS Isn’t Low on Space
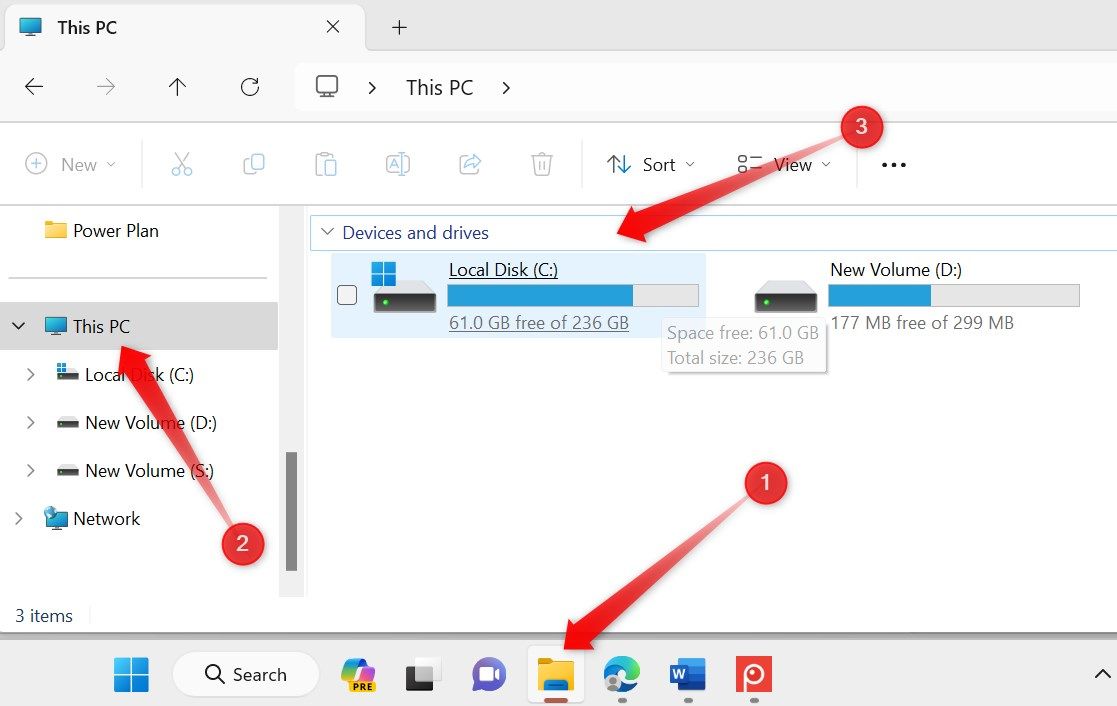
When the drive housing your operating system does not have enough free storage space, the system and applications may struggle to write temporary files and execute other essential operations. This can lead to system instability, contributing to slow performance. If your PC suddenly slows down, it’s worth checking the available storage on your drive.
Click on the folder icon in the taskbar to open File Explorer. Then, navigate to “This PC” and review the free space on the drive containing your operating system. It will be the C: drive by default.
While there’s no exact figure for the ideal amount of free space for optimal computer performance, we recommend keeping at least 10 to 15 percent of your drive empty. This provides ample space for virtual memory and temporary files. If the drive storage is near its maximum capacity, take steps to free up disk space.
Switch to the Ultimate Performance Plan
A power plan encompasses hardware and system settings that dictate how your system uses power. Windows mainly offers two main power plans: Balanced and Ultimate Performance.
The Balanced plan is suitable for general use and is recommended by Windows for its lower battery consumption. On the other hand, the Ultimate Performance plan is ideal for high-end tasks where maximum performance is essential. So, switching to this plan may improve your system performance and reduce slowdowns.
To switch to the Ultimate Performance plan, type “Control Panel” in Windows Search and open the Control Panel app. Then, navigate to System and Security > Power Options. Click “Show Additional Plans” and select the “Ultimate Performance” plan.
If you are on a laptop and don’t see the Ultimate Performance plan, you must enable it manually. To do so, open Command Prompt with administrative privileges and copy-paste the following command:
powercfg -duplicatescheme e9a42b02-d5df-448d-aa00-03f14749eb61
After enabling the plan, follow the steps mentioned to select the Ultimate Performance plan in the power settings.
Close Resource-Hungry Processes in Task Manager
Maxed out RAM, CPU, and disk resources can also slow down your system. To check if they are, right-click the Start button and open “Task Manager.”
If you notice consistently high use of your CPU, memory, or disk resources, reaching nearly 80-100 percent, it indicates that the limited availability of these resources is likely the underlying cause of the slowdown.
To address this, click on the header of the RAM, CPU, or Disk column whose resource consumption is high. Windows will then sort the processes by resource consumption in descending order. Review the top-most processes that consume the most resources and filter out those processes you can disable. Then, right-click each of them and select “End Task.”
Closing tasks will release the previously utilized resources. Your device should perform better after freeing up system resources.
If the above fixes fail to resolve the performance issues on your Windows PC, consider performing a clean boot. This restarts your device with only essential services, eliminating potential interference from non-critical services. If the problem persists, perform a System Restore to revert your PC to a previous state when it was running smoothly.
source


