Styles in Word are typically used to enable quick and consistent formatting across headings and paragraphs. However, Word’s style separator function allows you to use two styles within a line or paragraph, meaning you can format your work more dynamically and control your table of contents more accurately.
What Is a Style in Microsoft Word?
Word contains built-in styles that you can use to quickly format text in pre-defined ways. For example, a style has its own font typeface, font size, line spacing, paragraphing controls, and other elements. You can either leave the pre-defined styles as they are, or change the style’s characteristics to suit your requirements.
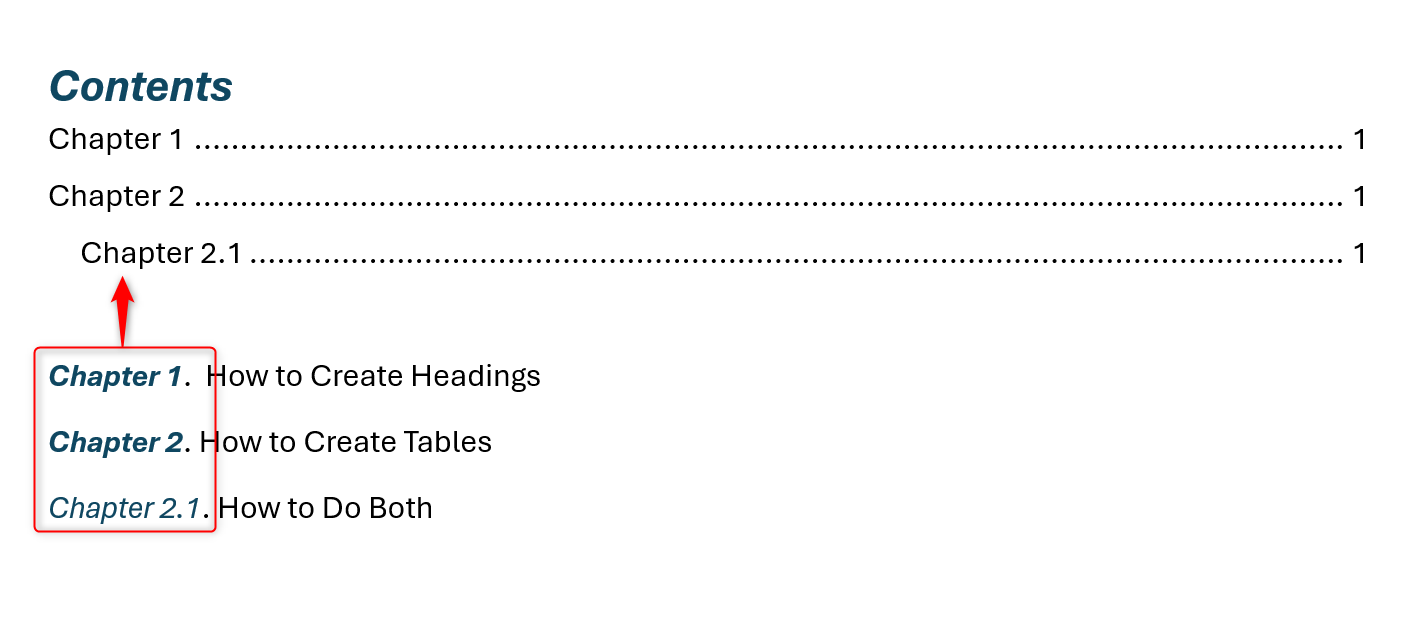
Furthermore, when you create or update a table of contents in your Word document, it will pick up any text in the heading styles to produce a more concise table. In this example, you can see that the automatically produced table of contents at the top of the document has picked up the details presented in heading styles in the main part of the document, but not the details in the normal style.
Styles are usually used to define how headings and paragraphs are formatted separately—however, there may be occasions when you want to use two styles in the same paragraph. Let’s check some of these out in more detail.
When Would I Use a Style Separator?
The style separator is undervalued in its diversity and range of uses. Here are some examples of when you might want to use it:
- Keeping a heading on the same line as the main body of text (rather than having them as separate paragraphs), especially if you’re limited by space;
- Including an image caption title in your table of contents without displaying the whole caption;
- Using—and spell checking—two or more languages in one paragraph (for example, if you’re writing a novel in English, but a Spanish character is speaking).
And once you know how to use style separators, you’ll undoubtedly uncover more uses for this hidden gem.
How to Use a Style Separator in Word As You Type
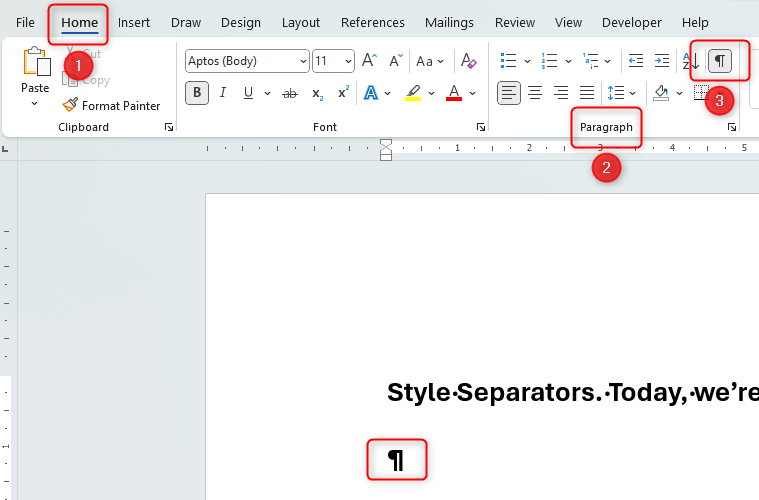
Before you use the style separator, turn on the Show/Hide option in Word. This will make it easier for you to check you have used your style separator accurately down the line. Do this by clicking “Home”, then open up the “Paragraph” group, and click the “Show/Hide” (¶) icon. Alternatively, you can press Ctrl+Shift+8 (use your standard keyboard keys, and not your number keypad). To deactivate the Show/Hide option, simply click the “Show/Hide” icon again, or press Ctrl+Shift+8 again.
You will now see markers alongside your text in your document. Don’t worry—these won’t show if you print your document. They’re there to help you organize your document and its layout more easily.
In the following example, the two styles in use are a heading style and a normal style. However, the same principle can be applied to any style, including styles containing different languages or fonts/colors.
Now, we’re ready to use the style separator. First, type the text you want to have in the first style.
With the cursor somewhere within, immediately before, or immediately after that text, select the style you want to apply. Remember, if you want to put your headings into a table of contents later down the line, it will be useful to choose a header style. In this case, we’ve chosen a modified header style.
We now want to type the main body of text in this section, using a normal style, but on the same line as the header. With the cursor at the end of the header, press Ctrl+Alt+Enter, and this will create a style separator, appearing in a faint box.
You will now notice that the next paragraph marker automatically reverts to the normal style (in the case above, black font), and you can then go on to type your paragraph. You can now click anywhere either side of the style separator to amend the respective styles.
How to Add a Style Separator to Existing Text in Word
First, press Ctrl+Shift+8 on your standard keyboard keys (not your number keypad) to turn on the Show/Hide (¶) option.
Let’s assume the following text is already typed into a Word document in a normal style. We now want to change the style of the first sentence to make it a heading, keeping the second sentence as it is.
First, we need to separate these sentences into two separate paragraphs. Place your cursor at the end of the first sentence (after any punctuation), and hit Enter.
Now, move your cursor up to the end of the first sentence (where you want your style separator to be), and press Ctrl+Alt+Enter. This will add a style separator after the first sentence and bring the second sentence up to the same line.
You can now click anywhere within each sentence and separately adjust the styles to your preferred settings.
How to Remove a Style Separator in Word
Removing a style separator is relatively straightforward, but be aware of the formatting consequences of doing so. To do this, place your cursor immediately after the style separator and press the Backspace key.
You will see that the style separator has been removed—however, because of this, the whole paragraph, including the part after where the separator was, now adopts the style that was applied to the segment before where the separator was. You can now either change the whole paragraph to a different style, separate the two sentences into separate paragraphs and amend their respective styles, or re-insert a style separator in the appropriate place in your paragraph by following the steps above.
Now you know how to use Word’s style separator to save space, follow a style guide, or enable the easier creation of a table of contents!
source


