Key Takeaways
- Monitor RAM usage in Task Manager. If your RAM usage is regularly hitting 100%, you probably need to upgrade.
- Confirm whether or not your motherboard has extra RAM slots, and how much RAM each slot can accept.
- Examine the type and speed of your existing RAM, and ensure that any new RAM you purchase is of the same type and isn’t too fast for your motherboard.
Considering adding more RAM to your computer and unsure where to begin? This guide covers everything you need to know about upgrading the RAM in your Windows PC or laptop. Let’s get right into it.
Do You Even Need a RAM Upgrade?
Before delving into the process of upgrading your RAM, it’s crucial to assess whether an upgrade is even needed. Do you experience system lag, frequent BSOD errors, or sudden crashes of apps and programs? These are symptoms that can indicate memory bottlenecks. However, it’s essential to be aware that other hardware problems can also lead to similar issues.
There is a simple test you can perform to determine if your RAM is indeed the culprit. Run the app or program during which you encounter the problems mentioned above. Minimize the program, right-click the Start button, and select “Task Manager.” Make note of the RAM usage as the program continues to run in the background.
If the RAM usage remains consistently around the 60 percent mark (or less) without spiking to 100 percent, it indicates that an upgrade is probably not necessary. However, if you observe the RAM usage spiking to 100 percent, and you experience the signs of RAM bottlenecking that we mentioned earlier, your current RAM likely needs an upgrade.
Check the Currently Used and Maximum RAM Capacity
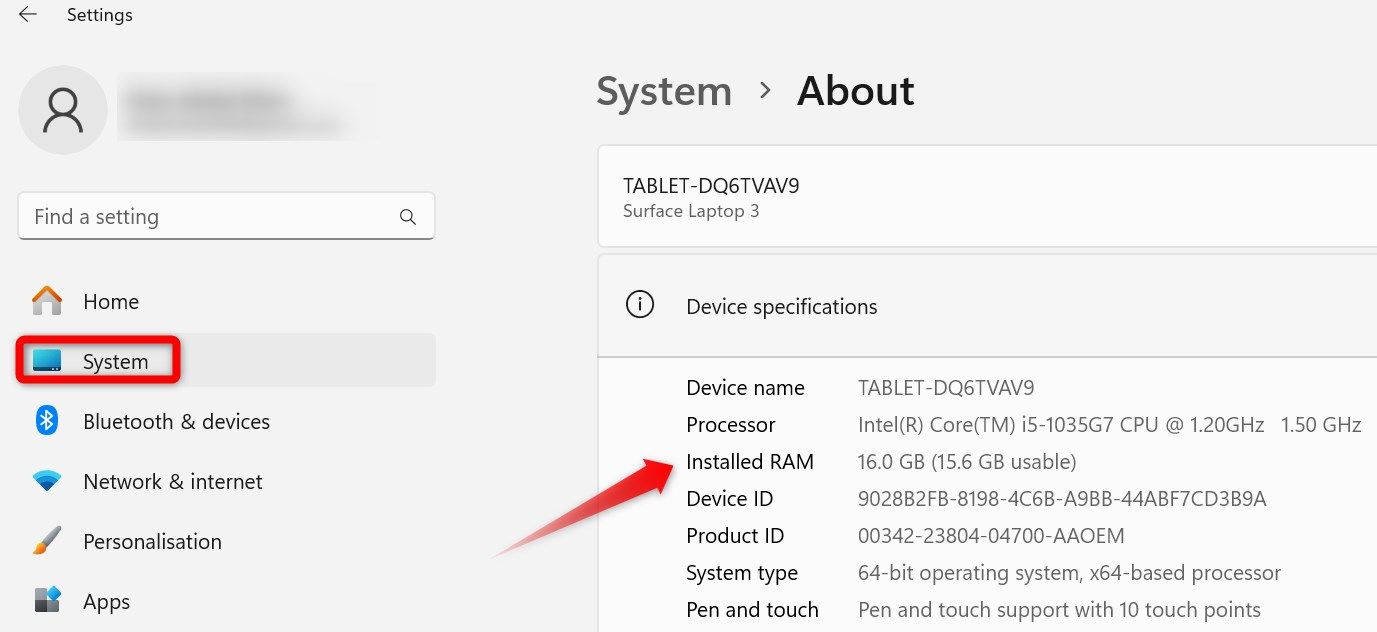
After confirming that your RAM needs an upgrade, the next step is to check the current amount of RAM your PC has. To check this, right-click the Start button and open “Settings.” Navigate to the “System” tab on the left, scroll down to the bottom on the right, and go to “About.” Here, check the total RAM indicated next to the Installed RAM.
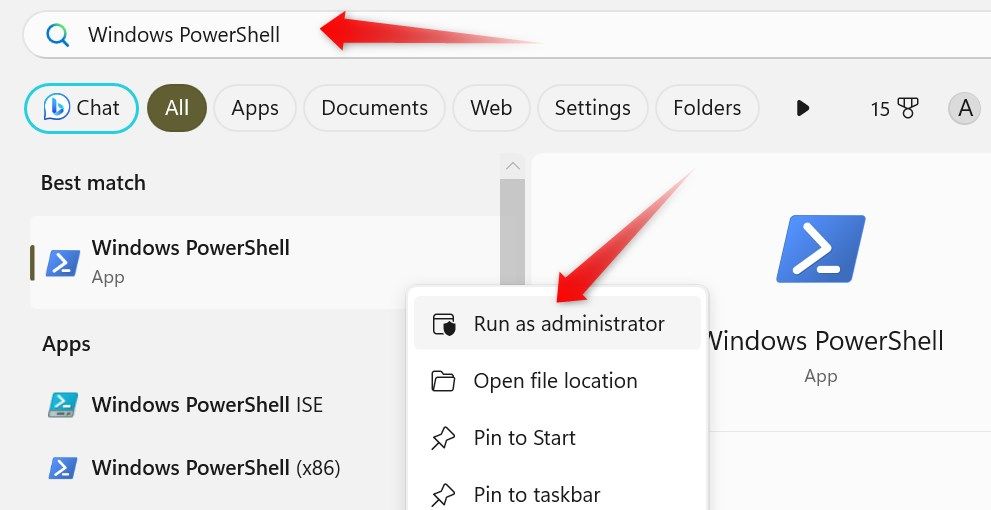
After that, check how much RAM your PC can accommodate. Type PowerShell in Windows Search, right-click on “Windows PowerShell,” and select “Run as Administrator.”
Copy and paste the following command into PowerShell and press Enter.
Get-CimInstance Win32_PhysicalMemoryArray
Take note of the value under MaxCapacity, which represents the total RAM in kilobytes that your motherboard can accommodate. To convert kilobytes into gigabytes, divide the number by 1048576. We’ve included a quick reference chart below for some common values you might see. If the maximum capacity is less than the RAM you currently have, for example, 32 GB compared to the 16 GB you’re now using, you can add 16 GB of RAM to your system.
Here is a quick reference chart if you don’t want to work it out manually:
Max Capacity Value | RAM Capacity in Gigabytes |
134217728 | 128GB |
67108864 | 64GB |
33554432 | 32GB |
16777216 | 16GB |
8388608 | 8GB |
Having spare capacity doesn’t necessarily mean you can immediately purchase RAM and install it. First, you must check if you have available RAM slots to accommodate the additional RAM.
Check for Free RAM Slots on Your Computer
A RAM slot, also referred to as a RAM socket, is a long, slim slot on a PC’s motherboard where the RAM is installed. Most computers typically have two or four RAM slots. It is essential to confirm that some slots are free before purchasing new RAM.
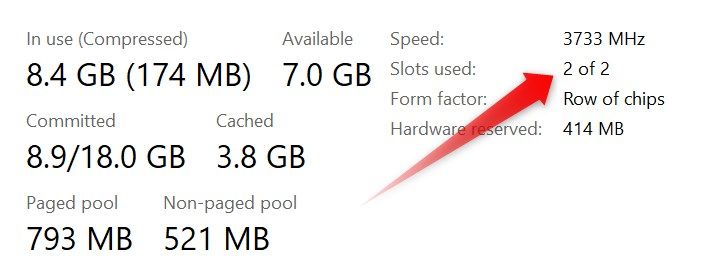
To do so, right-click the Start button and open “Task Manager.” Navigate to the “Performance” tab on the left and look at the RAM information at the bottom of the screen. Right next to “Slots Used,” you can see the total number of RAM slots your system has and how many are currently in use.
Hovering your mouse cursor over this number also details how much RAM each slot supports. If you have free slots available to accommodate the RAM you plan to upgrade, you’re all set. However, what if no free slots are available, or you’ve already reached the maximum RAM capacity?
No Free Slot or Reached Maximum RAM Capacity?
If you have already reached your motherboard’s maximum supported RAM capacity, that becomes the primary limiting factor. To confirm that you have really reached the maximum supported RAM, refer to the motherboard manufacturer’s documentation and see how much RAM it supports. If the motherboard does not support additional RAM, upgrading your motherboard is the only viable option.
If you have spare capacity but no free RAM slots, investigate whether your motherboard supports higher-capacity RAM modules. If it does, you can replace your existing modules with larger ones, taking into account compatibility, capacity, speed, and DDR variant restrictions. We’ll cover how you can do this in the next section. If your motherboard does not support higher-capacity modules, upgrading your motherboard is once again your only option.
Given the technical nature of this process, seeking advice from the manufacturer or a knowledgeable professional is advisable if you are uncertain about anything.
Check RAM Speed, RAM Type, and More
If you have confirmed the presence of free slots and available capacity, indicating that you can upgrade your RAM, you are halfway through the process. The next step is to check the specifications of your currently installed RAM, mainly RAM speed and RAM type. This will help you avoid any compatibility issues when upgrading your RAM.
Running a simple command in the PowerShell utility can reveal the RAM specs for you. Just copy-paste the following command and press Enter.
Get-CimInstance CIM_PhysicalMemory
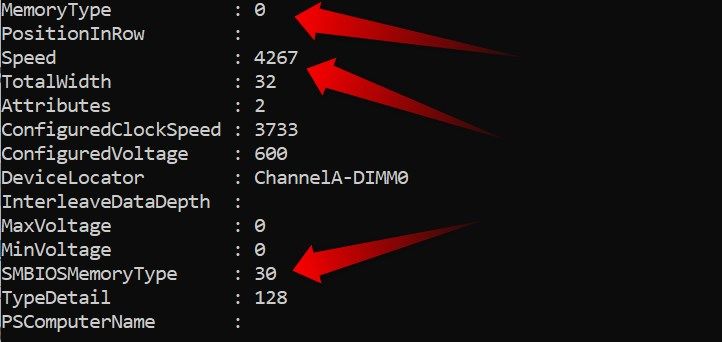
Note the RAM speed, indicated next to “Speed,” and check the RAM type next to “MemoryType.” If you see “0” next to MemoryType, as shown below, note the value next to “SMBIOSMemoryType.” A value of 20 corresponds to DDR, 21 to DDR2, 22 to DDR2 FB-DIMM, 24 to DDR3, 26 to DDR4, and 34 to DDR5.
If you see “0” or an unusual value and cannot determine the RAM type, consider using a third-party app like CPU-Z. Such apps can help you confirm the type of RAM currently installed.
Since it is generally impossible to mix and match DDR types, make sure you buy RAM with the same DDR type and speed as your current one to prevent compatibility issues post-upgrade.
Most RAM (assuming it is the correct type) will work with any PC, but you can typically find more specific information about RAM, CPU, and motherboard compatibility on the manufacturer’s website if you want to be extra sure. Once you know what limitations you’re dealing with, you can get the best RAM for your PC.
If you want to upgrade RAM on a laptop, the process can be tricky. Sometimes it is as simple as popping off the bottom and sticking in new RAM, much like a desktop. Other times, disassembly is complicated, and the RAM may even be permanently attached to your laptop’s motherboard. If you’re not extremely comfortable messing with electronics, you should seek professional help to avoid potential damage to other components of your laptop.
Hopefully, you now clearly understand whether you can upgrade the RAM on your system and the proper steps to take it. When upgrading RAM, consider opting for a higher capacity than your current needs. This approach helps you avoid the necessity of upgrading again in the near future.
source


